
And so begins the first of a long-to-run weekly series dedicated to simple changes you can make to your website, web properties and other areas of your marketing campaigns that will have sizeable impacts. This series will include many articles by Beanstalk and others by guest authors hand-picked based on their expertise and ability to deliver clear and actionable direction. This series will span a number of areas, in fact there are only two guidelines they will all follow:
- each will give five tips on a single area, and
- in most scenarios they can be implemented in a couple hours or less
The goal is to provide you, our valued readers, with a weekly task and with all the information you’ll need to complete it and to focus on the tasks with meaningful impacts on completion. With that in mind, welcome to our 5 Quick Tips series. Let’s get started with …
Improving PageSpeed On Apache Servers
There are two speed measurements to be concerned about:
- PageSpeed – the Google measurement of how well optimized a web page is for speed, and
- Page Speed – the actual speed of a web page
In this piece we’re going to focus on Google PageSpeed which you can view for your site using PageSpeed Insights. In this effort we’ll be focusing on the following 5 PageSpeed warnings:
- Leverage browser caching
- Optimize images
- Enable compression
- Minify CSS & Stylesheets
- Reduce server response time
So let’s start with …
-
Leverage Browser Caching
For those unfamiliar with browser caching, in a nutshell it’s telling the browser to remember resources for use later. This allows pages to load faster in a future visit as the resources will already be held by the browser and not need to be downloaded.
The easiest way to enable browser caching on an Apache server is through a very simple addition to the .htaccess file. Simply add the following code to it:
## Start browser caching ##

<IfModule mod_expires.c>

ExpiresActive On

ExpiresByType image/jpg "access 1 month"

ExpiresByType image/jpeg "access 1 month"

ExpiresByType image/gif "access 1 month"

ExpiresByType image/png "access 1 month"

ExpiresByType text/css "access 1 month"

ExpiresByType text/html "access 1 month"

ExpiresByType application/pdf "access 1 month"

ExpiresByType text/x-javascript "access 1 month"

ExpiresByType application/x-shockwave-flash "access 1 month"

ExpiresByType image/x-icon "access 1 year"

ExpiresDefault "access 1 month"

</IfModule>

## End browser caching ##
You will want to change the timelines to whatever makes sense for you. The longer the timeframe the less often a resource will have to be downloaded however if you replace a resource (say – your logo) with a file of the same name the old one will display as the browser believes it has the file. To get around this, when you change a resource like your logo, if you simply give it a new name the browser will understand it hasn’t seen the file before and get the new one.
-
Optimizing images

The first step of this process is the easiest, simply resize them. One of the most frustrating things I see in my travels is sites that use images larger than the size they’re displaying on a page. Massive 5000px by 3000px images shrunk down in the image call to 500 by 300 or some such thing. This is where the largest savings occurs in image size optimization. All you need for this stage is a good image editing program (or even a not good one for that matter). Resize the image to the size it will display as on the page. No more and no less.After that the next step is to optimize the image for itself. Images tend to include a lot of extraneous code in them from camera data to using a larger color palette than necessary thus adding bits to each pixel that aren’t necessary. But enough about that, how do you fix it? There are many ways using standard image editing programs such as Photoshop (read details on this here) but assuming you don’t use Photoshop or a similar tool I’ve found TinyPNG quite handy in a pinch.
Just process your image through it and reupload them (after insuring that the image quality is still suitable and nothing went wrong of course) and your problem will be solved.
-
Enabling Compression

Enabling compression on a web page is exactly what it sounds like, it’s basically shrinking a file and sending it to be expanded on the other end. It’s a very similar idea to creating a Zip file of your page and sending it to be unziped by the browser on the other end. It reduces the bandwidth needed dramatically and thus increases the speed of your site.Similar to enabling browser caching, enabling compression on an Apache server is done easily via the .htaccess file. And here’s the code to add:
<ifModule mod_gzip.c>
mod_gzip_on Yes
mod_gzip_dechunk Yes
mod_gzip_item_include file \.(html?|txt|css|js|php|pl)$
mod_gzip_item_include mime ^application/x-javascript.*
mod_gzip_item_include mime ^text/.*
mod_gzip_item_exclude rspheader ^Content-Encoding:.*gzip.*
mod_gzip_item_exclude mime ^image/.*
mod_gzip_item_include handler ^cgi-script$
</ifModule>This tells the server to compress your files using the gzip format and is supported by all major browsers. If for some reason it doesn’t work however you can try the following:
<IfModule mod_deflate.c>
AddOutputFilterByType DEFLATE image/x-icon
AddOutputFilterByType DEFLATE text/css
AddOutputFilterByType DEFLATE text/html
AddOutputFilterByType DEFLATE text/javascript
AddOutputFilterByType DEFLATE text/plain
AddOutputFilterByType DEFLATE text/xml
AddOutputFilterByType DEFLATE application/javascript
AddOutputFilterByType DEFLATE application/rss+xml
AddOutputFilterByType DEFLATE application/vnd.ms-fontobject
AddOutputFilterByType DEFLATE application/x-font
AddOutputFilterByType DEFLATE application/x-font-opentype
AddOutputFilterByType DEFLATE application/x-font-otf
AddOutputFilterByType DEFLATE application/x-font-truetype
AddOutputFilterByType DEFLATE application/x-font-ttf
AddOutputFilterByType DEFLATE application/x-javascript
AddOutputFilterByType DEFLATE application/xhtml+xml
AddOutputFilterByType DEFLATE application/xml
AddOutputFilterByType DEFLATE font/opentype
AddOutputFilterByType DEFLATE font/otf
AddOutputFilterByType DEFLATE font/ttf
AddOutputFilterByType DEFLATE image/svg+xml -
Minify Scripts & Stylesheets
If you’ve ever looked at a style sheet, script or HTML you’ll notice that it’s generally organized to be easily read. Of course, that’s wonderful when you want to read it but requires a lot (and I do mean a LOT) of extra bytes of data. To minify a file is to reduce all those characters down to the minimum necessary to remain functional. Essentially, removing unnecessary tabs, spaces, etc.
You can actually download minified version of your un-minified files right from the PageSpeed tool itself. After you run the tool you’ll be presented with a list of all the issues you have. At the bottom you’ll see:
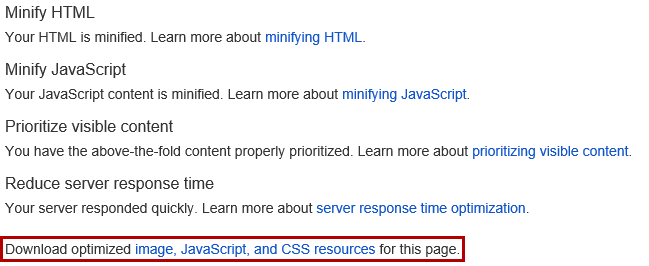
Clicking on the link in the sentence, “Download optimized image, JavaScript, and CSS resources for this page.” will download the images, JavaScripts and style sheets in their optimized forms. I’ve found better success with the image optimization using the techniques above however this method does work well for both JavaScripts and CSS. You’ll want to remember to make a backup of your current (easily read) style sheet to use for editing should you need it in the future (or if something goes wrong obviously). Once you’ve done that simply upload the new files to your server and they’ll be minified.You can also enter your file content into tools like:
CSS Minifier
or
JavaScript MinifierYou may have noticed that I haven’t included HTML minification here. HTML minification has a lot more room for issues. You can use tools like this one at GitHub but be aware that the room for error is greater here and full backups and complete testing are required.
-
Reducing server response time

And last but not least, the reduction of the server response time. Basically what we’re talking about here is reducing the time between the initial request from a browser for a web page and the time the server begins sending all the 1s and 0s necessary to display it. Let’s use a simple example to illustrate where the problem comes from. Let’s imagine that your web server can support 1000 resource calls per second (this assumes all resources are the same which they are not but it works for the example) without slowing down. Now, if your web page has 100 resources (images, scripts, style sheets, etc.) then your site can support 10 page requests per second. And maybe that was enough when you first got on the web and were the only visitor to your site but as your visitor count grew so too did the page views. So now you have 20 pages being requested every second and you’re getting the “Reduce server response time” notice. So what do you do? There are three options:1 – reduce the number of calls to the server, or
2 – increase the performance of the server, or
3 – ignore the problem and torture your visitorsAssuming #3 isn’t an option let’s look at the second option first. If you’re getting the “Reduce server response time” message you can contact your hosting company and simply upgrade the server to include more RAM, CPU allocation and/or faster hard drives to address. These are generally the bottleneck points and giving your site more resources will undoubtedly solve the problem and is never a bad idea BUT it may hide another issue …
Fundamentally the problem arises from having more resource calls than a server can handle and the more visitors to a site the more amplified the issue. Before upgrading your server the first step should always be to assess what resources are being called and question whether they are necessary and if they are, if there’s a better way to deploy them.
The first place to start is at a tool like Web Page Test which will pull your page and provide statistics on each resource it calls. I prefer the waterfall view. This view displays a list of all recourse and when you hover over them it displays details on how long it took to locate and load the resource. But what do you do about it?
1 – Eliminate any unnecessary resources. If you find resources being called that are unnecessary remove them. Often we find unused plugins, old tracking scripts and other clutter on a web page. Removing this clutter is stage one. This can also mean limiting resource calls to specific pages. If you’re tracking clicks on a page using CrazyEgg or other similar tool only add it to the page being tracked not every page on your site.
2 – After you’ve eliminated unnecessary resources we need to look at way of speeding up those that remain. Assuming you’ve minified your CSS and scripts and optimized your images and are still having this problem it’s time to look to a Content Delivery Network (CDN). You will want to discuss options with your hosting provider or developer as each host and web setup is different.
3 – At this stage you have minimized the number of resource calls and optimized those that remain. If you are still getting the message it’s time to upgrade your hosting. The reason I recommend optimization first is that going straight to upgrading your server simply masks the problem and as traffic grows you’ll need to upgrade sooner again. Dealing with the root of the issue first allows you to save on hosting and know you’ve got the fastest setup possible.
And Now Your PageSpeed Is Faster
Most of the solutions above are extremely fast to deploy. Numbers 1, 3 and 4 can generally all be done in less than 30 minutes and number 2 completed in about 5 to 10 minutes per page. Number 5 obviously ranges in how long it takes depending on what’s necessary but needed to be included. For those with decent hosting providers and CMS like WordPress or Joomla the fifth can generally be addressed in under an hour (with most unnecessary resources being able to be removed with a simple plugin uninstall) but those with more complicated backends may have a more involved process ahead.
Hopefully you’ve enjoyed part one of this series. Next week we’ll be bringing you another 5 quick tips on how to improve your website and your web marketing quickly and (almost always) easily.